You can save the time your customers and agents spend on filling out a questionnaire form by specifying which questions they actually need to answer.
When you click the Send Questionnaire to Complete button on the “Submission” page, the Select Which Questions to Complete dialog box opens (see the following figure). You can set the following conditions there:
- Select markets: markets whose questions you need to get the answers to. This list is based on your selection on the “Submission” page.
- Select questionnaire sections: sections containing the questions you are interested in. At least one section must be selected to send a questionnaire form.
- Select question types: the sort of the questions you are interested in: all, all unanswered questions, or all required questions that are not answered.
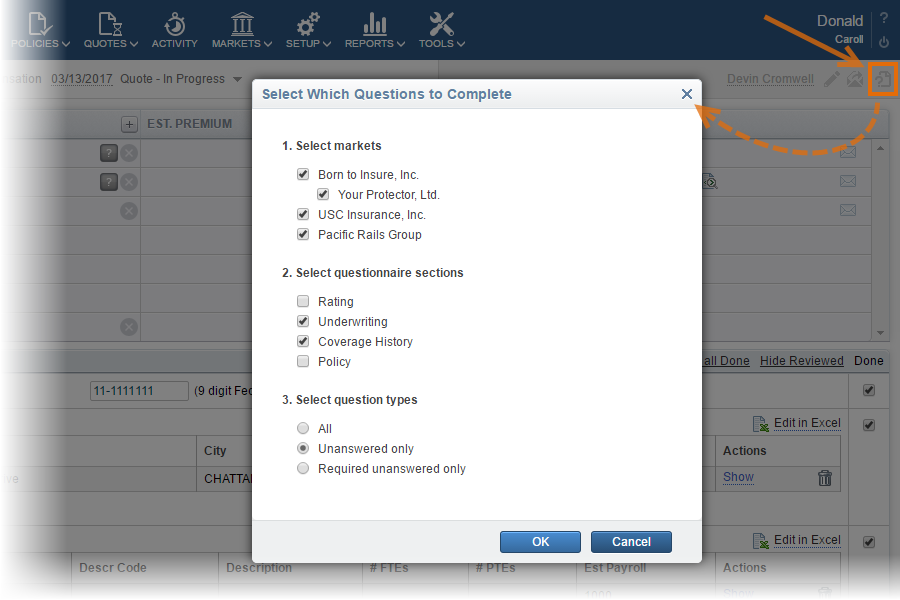
After you have sent the questionnaire form, the recipient will see only the specified questions on the open page.

Enhanced email notification system
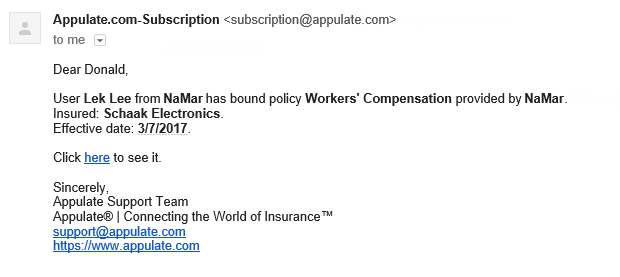
We have enhanced our email notification system for agencies and MGAs so that an agent is informed each time the status of a quote they submitted is changed.
Now it is easier for the agents of your company to keep track of the progress of a quote or policy they are in charge of because they will receive a relevant email message each time the status of this quote or policy is changed by the markets’ staff or automatically.
Email templates
You can create and modify your own email templates that the users of your company will be able to use in their outgoing email messages.
Appulate users need to compose different types of email messages when they communicate with their partners and customers. Since the set of such messages is quite limited in insurance business processes, you can prepare relevant templates to spare the time of your employees and standardize the outgoing email of your company.
We have redesigned the Email Templates page to meet these needs and facilitate email templates’ configuration. This page is divided into two tabs: Standard Templates and Custom Templates (see the following figure).
Note: To open the “Email Templates” page, click “Email Templates” on the “Setup” menu.
- The Standard Templates tab stores email templates prepared by Appulate team. One of these templates is utilized by default when a user performs a standard operation within Appulate, for example requests for a quote via email or sends a market an email message. Standard templates can be modified only by users with role “Admin”; users with other roles do not have access to this tab.
- The Custom Templates tab stores email templates created by your company’s users. Any template of this type can be used in an email message instead of the default standard template. Each user with role “Admin” or “User” has access to custom templates and can create, modify, or delete them.
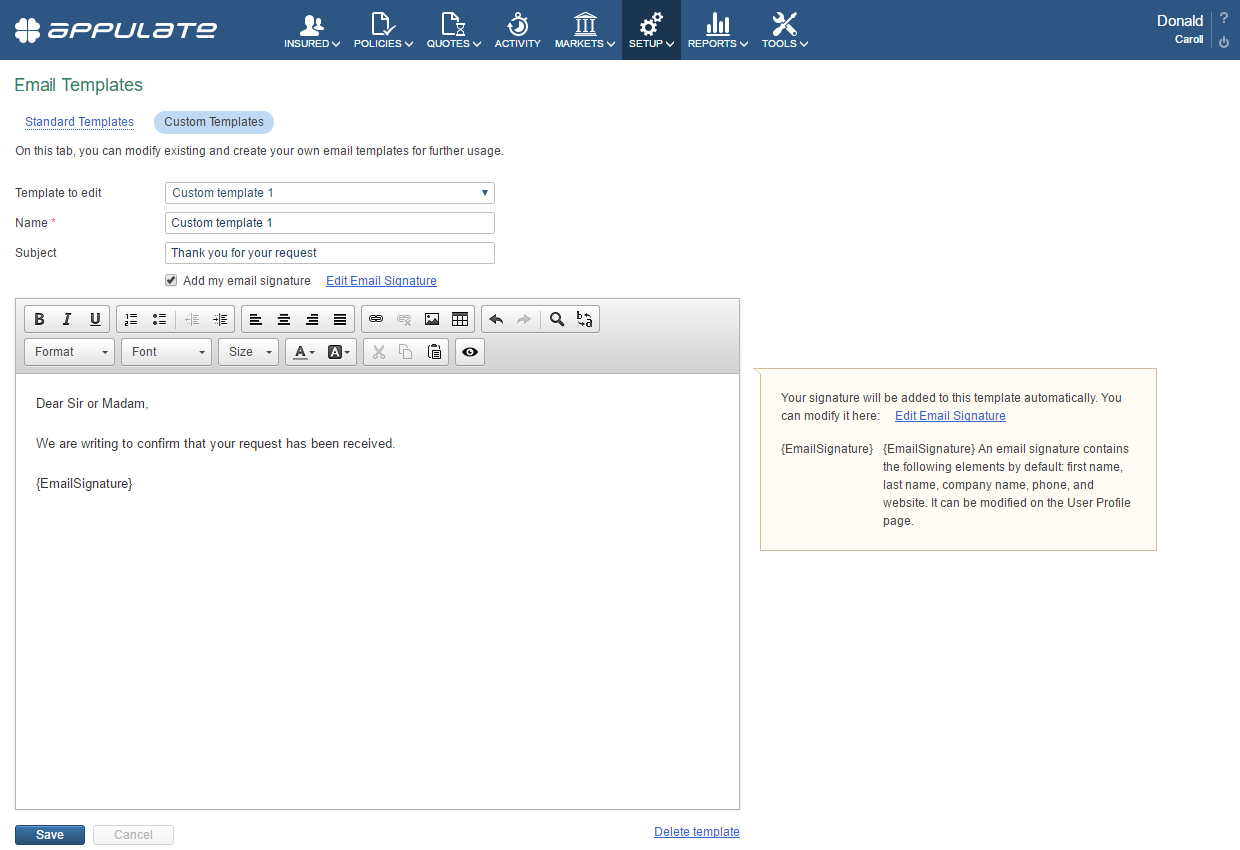
To open the Email Templates page, click Email Templates on the Setup menu. Both tabs have similar interfaces and contain similar sets of UI elements.
To create or modify an email template,
- Select “Create new” (for custom templates only) or select the template’s name in the Template to edit list. Specify the name of a new custom template in the Name text box (required).
- Enter or edit the subject and the body of the template in the respective text boxes (optional).
- Click the Save button.
The other buttons at the bottom are used to cancel the last changes (“Cancel”), restore a standard email template to its original version (“Reset to Default”), and delete a custom email template (“Delete template”).
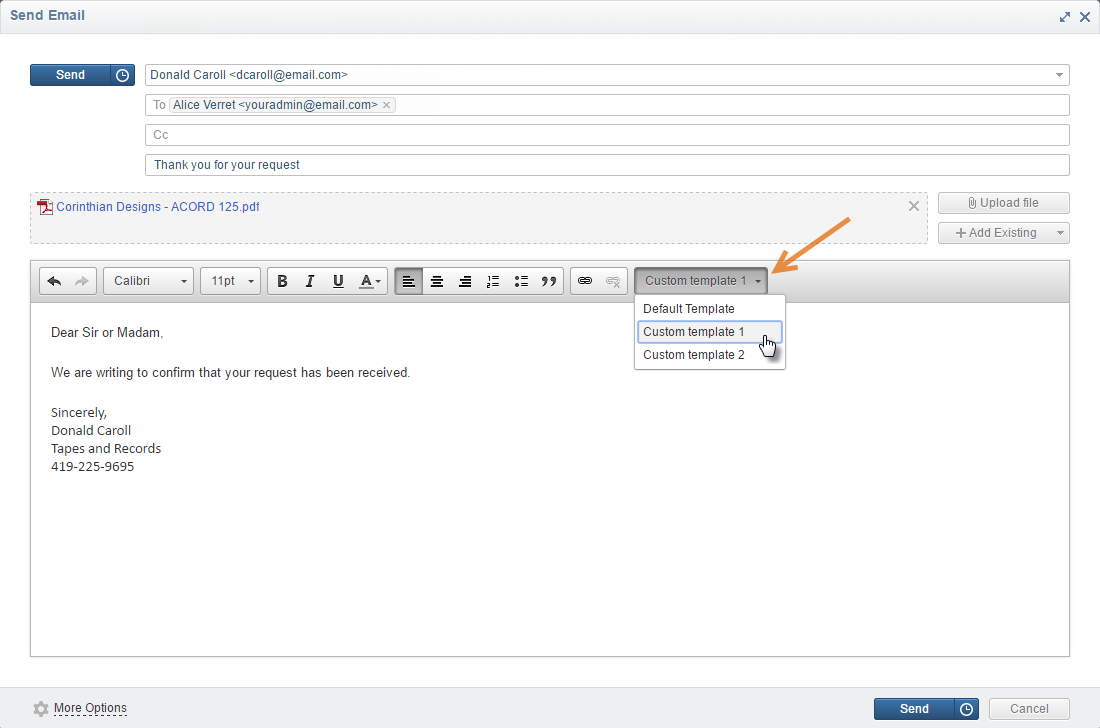
The new Templates drop-down list in the Send Email window is used to switch between the default standard template and custom templates (see the following figure). The subject and body of the email message are changed accordingly.
Note: This drop-down list is hidden if the company has no custom templates or if the user’s role is “Viewer”.
Controlling automatic policy renewal
You can prohibit the users of your and supervised companies from auto-renewing their policies.
The new setting of Auto-Renewal on the Settings page defines whether the users of your company and the users of the captive companies (i.e. agencies and MGAs working under your company) can renew their policies automatically, and, if they can, when the new quote will be created.
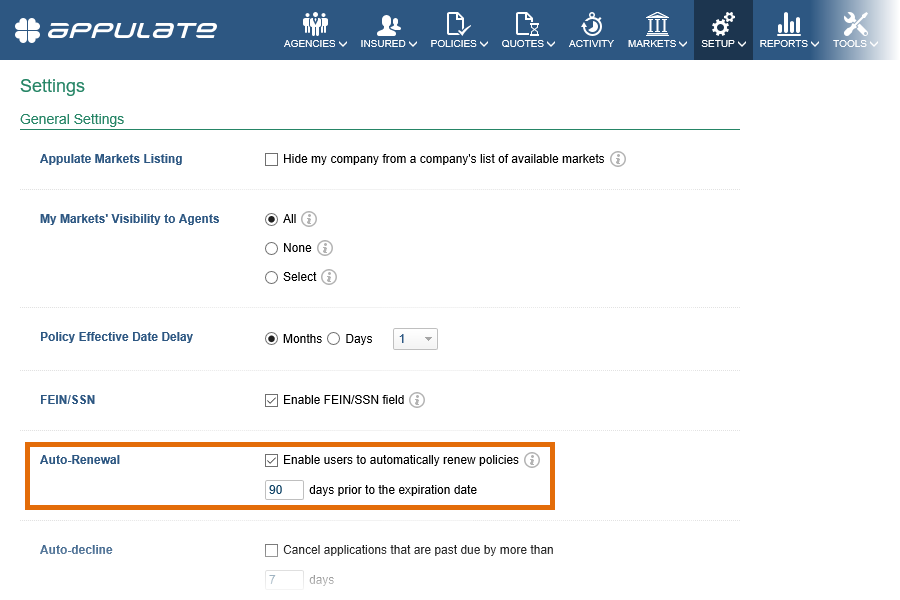
To give the users this ability, select the Enable users to automatically renew policies check box and specify how soon the new quote has to be created (in days prior to the expiration date). In this case, the Auto-renew check box will be available to the users on the Options tab of a policy page (see the following figure).
If you clear the Enable users to automatically renew policies check box, the Auto-renew check box will be hidden.
The administrators of captive companies cannot change this setting: they follow the rules introduced by the supervising market.
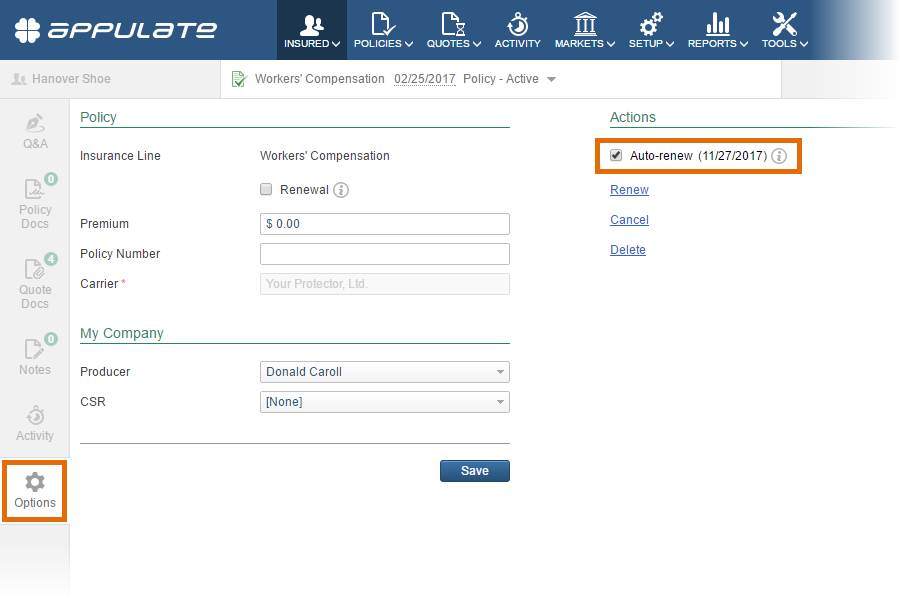
Note: If the automatic renewal is allowed, only policies with status “Policy – Active” or “Policy – Expired” can be renewed this way and only by the users belonging to the policy’s owner company (i.e. the agency or market whose worker created the initial quote).
Loss History collection enhancements
New Loss History collection features have been implemented to facilitate the relevant modifications.
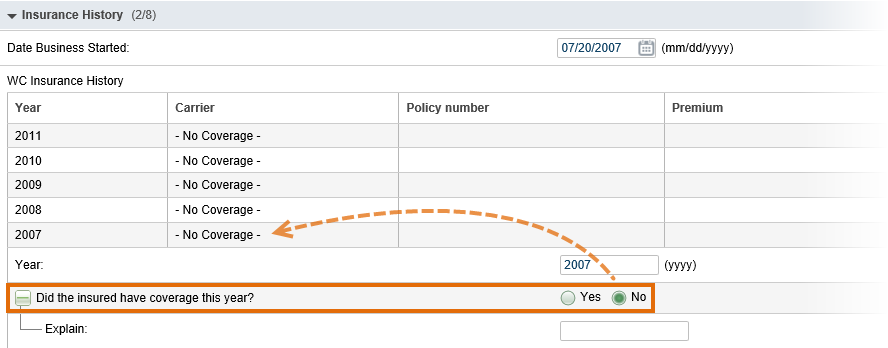
When you answer “No” to the question “Did the insured have coverage this year?” on the Q&A tab of the “Submission” page, the collection record reads “No Coverage”; no other questions are asked, and no other information is shown for this record.
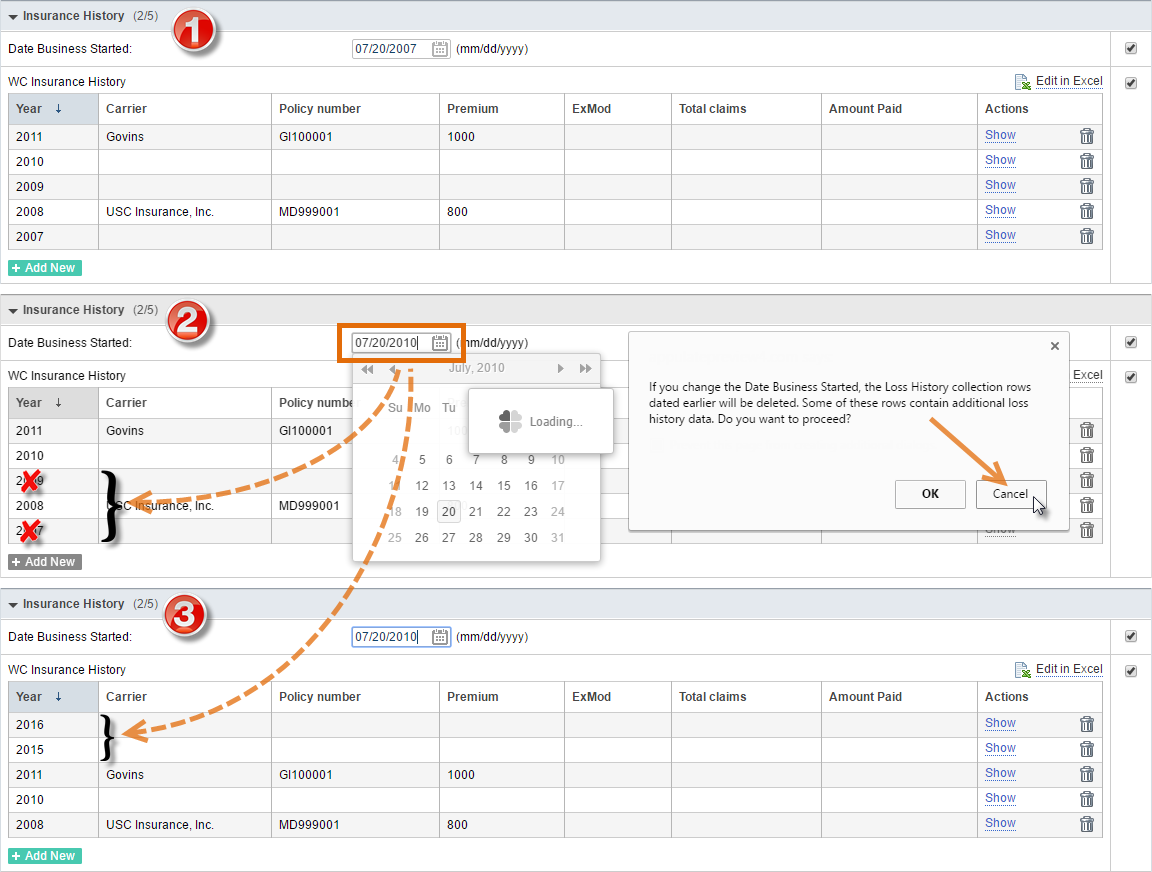
When you modify the Effective date of any Loss History collection record, the Effective and Expiration dates of this and earlier records are recalculated according to the following rules:
- The Effective date of the record dated 1 year earlier gets the modified Effective date minus 1 year, the Effective date of the record dated 2 years earlier gets the modified Effective date minus 2 years, etc (see the following figure).
- The Expiration date of each record whose Effective date has been modified or recalculated gets the respective Effective date plus 1 year (see the following figure).
- If an earlier record contains any data but the Year, Effective date, and Expiration date, then its Effective and Expiration dates are not recalculated. The Effective and Expiration dates of the records dated earlier than this record are not recalculated either, whether they contain any additional data or not.

If you modify the Date Business Started, this may affect the Loss History collection records in the following ways:
- The records dated earlier than this date (only Year is counted) will be deleted unless these records contain any data but the Year, Effective date, and Expiration date. In the latter case, a confirmation message appears: you can either delete or retain the records with additional data. The records without additional data are deleted unconditionally. (In the following example, figures 1 and 2, the Date Business Started is changed from “07/20/2007” to “07/20/2010”, and informative records are requested to remain. Thus, only the records of “2007” and “2009” will be deleted.)
- If a collection contains less than 5 records, new ones will be added, starting from the year prior to the quote’s Effective date and ending with the first year of the business. If a record corresponding to a particular year already exists, the new one will not be added. (In our example, two more records are needed to make their total number equal to 5. If we suppose that the quote’s Effective date is “03/15/2017”, then the records of “2016” and “2015” will be added – see figure 3.)